A Crash Course on 3D Printing in the Classroom
This post is designed to be a taster at how 3D printers work, don’t work and how they can be used in the classroom. This is the written version of a Professional Development Webinar Micromelon Robotics ran for teachers in 2022. Check out the events page to find out if there are other events coming up you might want to tune in for.
How Do 3D Printers Work?
The term “3D printing” encompasses several different technologies with their own benefits and drawbacks. We will mainly be discussing the currently most accessible and affordable 3D printer technology known as FDM (Fused Deposition Modeling). However, due to technological improvements and pricing reductions, resin LCD printers are also becoming a mainstay among hobbyists and schools alike.
FDM printers use spools of plastic, or “Filament”, which are melted down and laid out layer by layer on a usually heated platform or bed. You can think of this as a traditional printer, where each layer is a single page of paper, and the ink is the filament. Due to the physical size of the nozzle, the filament is pushed through, and the printer software configuration, these layers can vary in sizes smaller than a millimeter. This is where 3D printing’s biggest weakness is apparent. If you have a 0.2mm layer height and a 1 cm tall object, the printer will need 50 layers to be finished.
Where Is The Technology Currently?
3D printing has come a long way, from relatively crudely assembled printers in people’s garages to almost fully assembled machines for sale at your local electronics store. These days printers have been trending down in pricing and have seen a relative plateau in features, with the main focus on being usable out of the box. These are usually competing ideals and have led to two distinct pricing points for FDM printers.
The first of these price points is the less than $800 printers, which usually forgo some of the more “premium” features and support to meet this price point. These printers can be great for someone who has the time and knowledge to tinker and get them running optimally but are not great “workhorse” printers as they will require maintenance and repairs as they wear out and break more quickly.
The other price point is the greater than $800 printers. These usually come with excellent quality of life features such as automatically leveling the printer bed between prints or for it to know when it is out of filament and pause on its own. This makes for a much easier time using the printer and normally means less maintenance and more printing.
3D Printer Materials and When to use them
Another key part of FDM printers that must be discussed is the ever-advancing filament technologies. Remember filament is the Ink to 3D printers. Filaments come in many different types, all with their own mechanical properties. Some new and prominent types include; PETG – which is more resilient to heat and is more durable than the typical PLA, and ASA – which is very similar to ABS but can better withstand UV rays. Combination filaments are also becoming more prominent, using materials such as carbon fibers embedded inside the filament to give it more strength.
Here are a few details for the materials previously mentioned:
PLA
PLA is one of the most used materials amongst hobbyist 3D printers. It is easy to print, requiring low hot end temperatures. It has a very low tendency to warp while producing good details. PLA is also amongst the cheapest filaments to print with. The main downside to this material is that it is susceptible to temperatures near and above roughly 60 degrees centigrade and is brittle compared to other materials. These combined features leave us with a low-cost filament that is extremely good for printing prototypes and medium-strength objects for the classroom. We at Micromelon use this material whenever we need to prototype a design or print attachments for our Rovers as well as for most projects because its just easier to print with.
PETG
PETG is another highly used material with several benefits over PLA. It is only slightly more expensive than PLA while still being relatively easy to print with due to its low tendency to warp and similarly low hot end temperatures. It can be used to create tough and durable parts while maintaining a higher temperature threshold of 80 degrees centigrade when compared to PLA. The main downsides to this material are its properties while printing. It is prone to leaving thin wisps of filament when printing an object. It is also worse at performing unsupported bridging between parts of an object and suffers from some loss in detail on complex parts.
Additionally, due to the string layer adhesion, support material can be much harder to remove than with PLA. All these features combined leave us with a relatively low-cost filament that is extremely good for printing components that require higher strengths for indoor and outdoor use. Use PETG when the forces on your part are going to be much higher, for example wall hooks or shelf brackets. Some robotics applications you might use PETG for are sumo shields (to protect against metal shields) and the attachment spider clip (available on Thingiverse and Printables).
ABS
ABS is a plastic used worldwide in injection molding and was one of the first materials used by 3D printers. It has several advantages over other materials but also has several disadvantages that must be considered. ABS has significant mechanical resistances while being able to withstand temperatures up to 100 degrees centigrade. It can also be easily post-processed via acetone smoothing, in which acetone and its vapors can be used to melt the top layer of ABS. However, these properties come at the cost of significantly more difficult printing. ABS requires much higher hot end temperatures than the previously discussed materials and requires a closed-in printing chamber to avoid the warping of prints. ABS also gives off dangerous styrene fumes while printing, so it should only be done in a well-ventilated area. These combined features leave us with a relatively low-cost filament that is extremely good for technical parts exposed to high stress and temperature environments. Generally its best to avoid using ABS because of the fumes created in the classroom, however in some cases it might be necessary if you are going to place something in the sun for long periods of time.
ASA
ASA is a relatively new material used for 3D printer filament. It is very similar to ABS but comes with several upsides. ASA is considerably more resistant to UV rays when compared to ABS while maintaining most of its mechanical properties. Compared to ABS, it also warps less and doesn’t produce as many dangerous fumes. However, ASA still tends to warp without a closed-in printing chamber, and while it produces fewer styrene fumes than ABS, these fumes are still potentially dangerous. ASA is also more expensive when compared to ABS and other more established filament materials. All these features combined leave us with a material some consider to be a successor to ABS. It is best used for technical parts exposed to high stress and temperature environments indoors and outdoors. Like ABS, use ASA when you need you prints to be able to withstand heat and sunlight for extended periods of time.
Flexible Materials
“Flexible Materials” covers multiple filament types, all characterised by their flexibility. Due to this flexibility, these materials have excellent layer adhesion, can withstand significant mechanical forces without permanently deforming, and are generally resistant to wear. These materials are also usually suitable for printing dimensionally accurate objects due to their low shrinkage. These materials, however, are tough to print. They require significantly slower printing speeds compared to other materials, are very bad at bridging between parts of objects and are prone to leaving thin wisps of filament when printing. These materials are also highly hygroscopic and absorb water in the air leading to an even worse experience while printing. All these features combined leave us with an invaluable material when printing objects that need to bend, compress or otherwise conform to their environment. We at Micromelon do not regularly use this material due to its downsides, but we have required it for prototyping parts for our Rovers.
Composite Materials
The term “Composite Materials” covers multiple different filament types (PLA, PETG, etc.), all characterised by combining a polymer and filler material such as Carbon fiber or glass powder. This combination of materials results in improved mechanical properties, such as toughness. Due to this mixture, the material takes on the printing properties of the base polymer but with added downsides. Due to the addition of highly abrasive materials such as carbon fibres, the typical brass nozzle will wear down quickly and cause more frequent clogging. To remedy this, a hardened steel nozzle can be used, but these are significantly more expensive and will require re-tuning of the printer.
Additionally, this mixture of materials can result in produced parts having reduced layer adhesion. All these features combined leave us with materials with excellent mechanical properties, which are very useful in things like drone frames. We at Micromelon do not regularly use these materials, but we recognise their benefits.
How to Take Your Ideas To The 3D Printer
The most significant advantage that 3D printers give us is quickly taking an idea from the concept phase into reality. This approach is called “Rapid Prototyping”. It replaces the need to make something using hand tools or other typically large, expensive, and difficult to use machines. Anyone can take a design, print it, evaluate it, and tweak it in real-time for future iterations. This process is cheap and effective and helps instil a vital part of the engineering process in the designer.
The process of taking your idea to the 3D printer can be broken down into 3 distinct parts: Designing, Slicing and finally, Printing.

For students we often need to repeat this cycle a few times and in order to save class time, filament and failed designs, we normally start with ideation and sketching. Basically we follow the engineering design process, meaning we do lots of thinking and sketching at the start, before jumping into software to build our models, finally to print and evaluate where we went wrong.

3D Modelling and Design
Once you have finalised and fleshed out your idea, you must first design it in some CAD software like Tinkercad or Fusion 360. One thing to keep in mind is the physical limitations of your 3D printer. Creating too large or complex parts will lead to difficulties later down the line. Here are some rules of thumb to remember when designing parts and some examples.
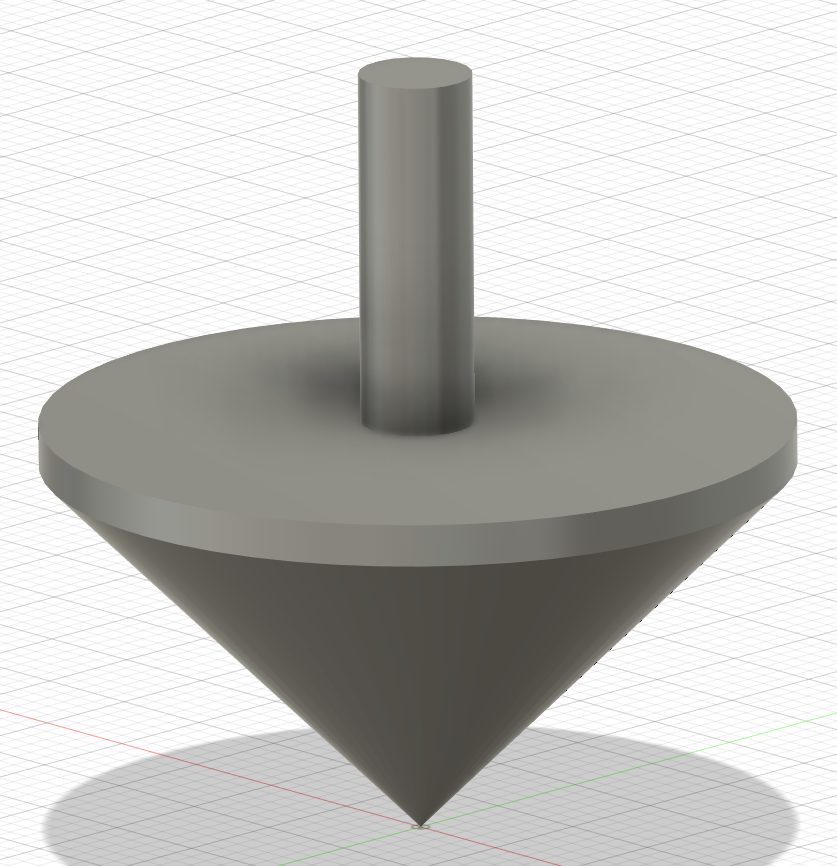
Rule: Keep a flat portion on the designed part to help with orientation on the printer.
The image on the left is an example of a spinning top that does not conform to this rule. We can see that this model will be impossible to print as there are no flat portions that can be placed on the printer bed. The image on the right shows a version of a spinning top that conforms to this rule. The handle has been made specifically so the spinning top can be placed upside down and printed with support.

Rule: Try to minimise the number of features in your design that are not directly connected to something below it
The image on the left is of a bracket with an overhanging portion on each side. For this to be printed in its current orientation, it would require support material between the bottom and top surfaces, which could be challenging to remove and leave a bad surface finish. The image on the Right shows the same bracket with the overhanging portions filled in, making it significantly easier to print.


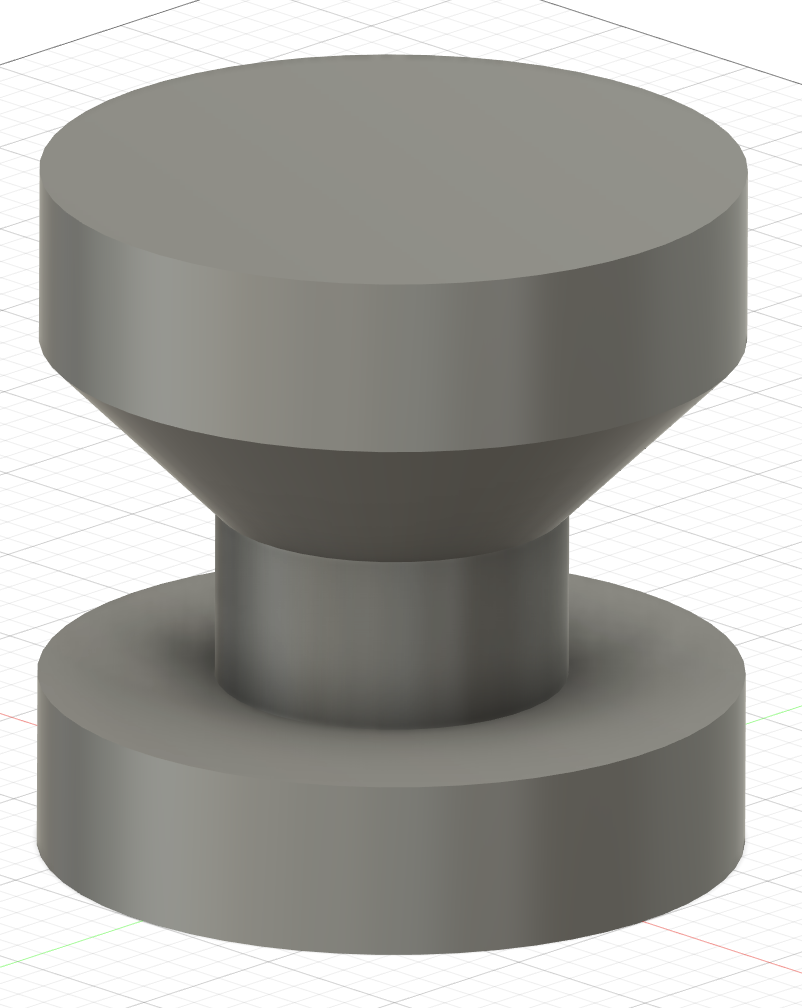
Rule: If you must have something sticking out from your design, try to keep it at an angle of more than 45 degrees to avoid the need for supports.
The image on the left is of a stopper meant to have an O-ring placed between the top and bottom ridges. For this to be printed in its current orientation, it would require support material between the bottom and top surfaces, leading to a reduced surface finish that could damage the O-ring. The image on the right is of the same stopper with a 45-degree angle added to the top surface. This now means that the stopper can be printed without the need for supports, ensuring a good surface finish.

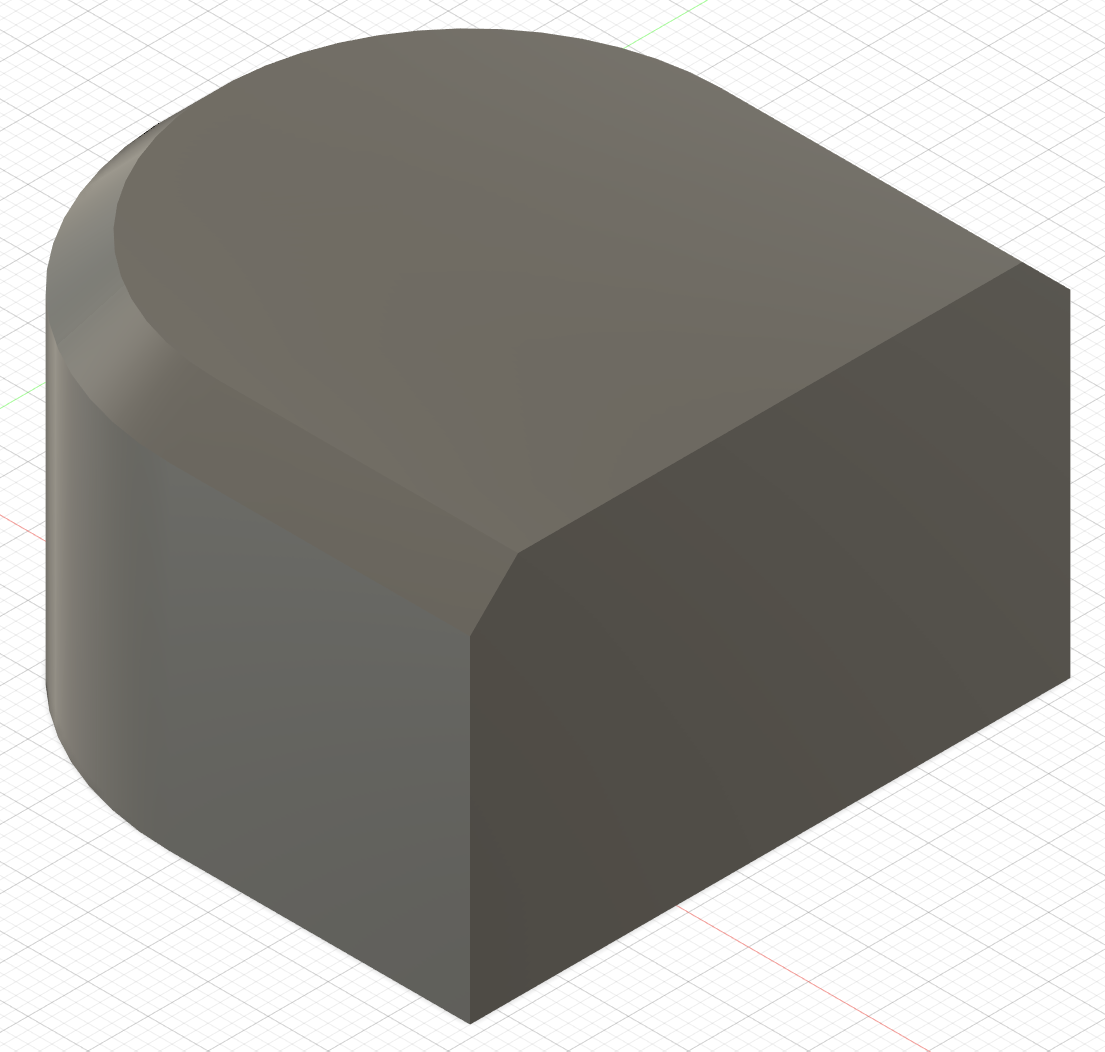
Rule: Due to the printing process, curves look best when orientated in the x and y-axis.
The image on the left is of a design with a curved portion pointing upwards. Due to the way that 3D printers slice models for printing, this curve will end up being made of layers with a height equal to the selected layer height. This will cause the curve to become less defined and to look more like steps. To avoid this, you should design your parts to be orientated with significant curves on either the x or y-axis. This is because the resolution of the x and y axises significantly better than the layer height. This can be seen in the image to the right, where the component is laid on its side.

Slicing
Here you will use a program such as Cura, or Prusa Slicer to take your design and translate it into something the printer can understand. These pieces of software will take your design and “slice” it into multiple layers based on both the physical characteristics of your printer and any software settings. This is where you must consider things such as supports, orientation, print times, etc. Your printer brand will determine which slicer you can use and we’d recommend using the manufacturer's version for best results. You can find these on the manufacturers website, normally on a sticker on the 3D printer itself. If you can’t find the software to use for your printer, reach out to us and we can help.
Printing
This is where you take your design to the printer. This can be done in one of several ways, depending on the features that your printer has. Some printers can print directly from a USB, others may need to print from an SD card, and more advanced machines can have files loaded onto them wirelessly over Wi-Fi. The printer will start printing your design once the file has been uploaded and selected. Follow your printer's user instructions for this part, sometimes they even have these on the front of the printer to make finding them easier.
Where things go wrong
Although 3D printers are fantastic pieces of technology that help us turn our designs into physical objects, they are still a complex piece of technology with many things that can go wrong. No matter how good the printer is, it is still susceptible to failure.
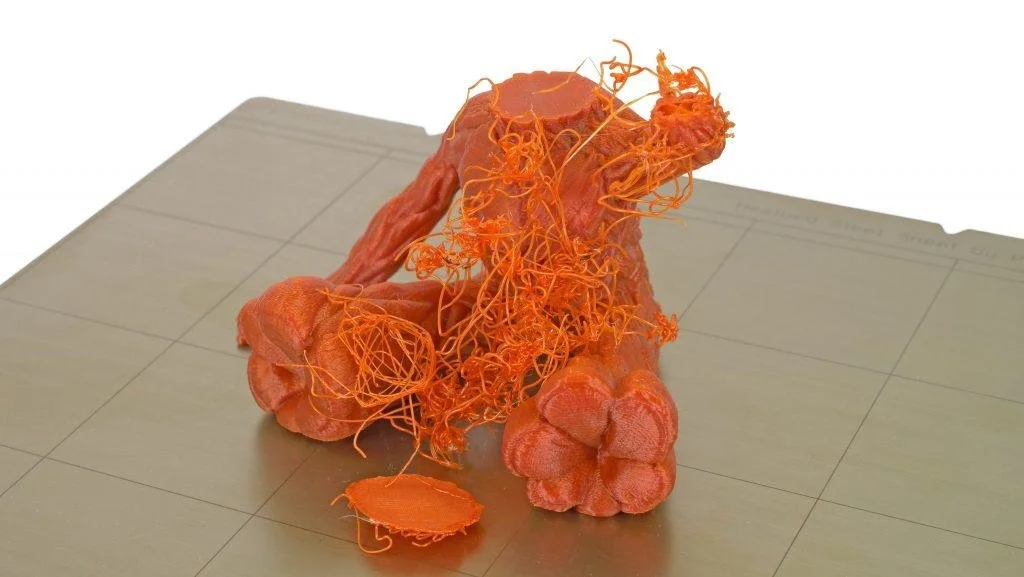
Image Credit: Prusa Research a.s.
No matter how well tuned your printer is, if it is given an impossible to print model, it will fail. This is where the previously mentioned rules of thumb come into play; minimising potential issues early in the design process can help prevent a lot of heartaches when finally printing. 3D printers may be complex machines, but they will only do what we tell them. If we ask them to print in thin air, they will attempt this, leading to the dreaded “spaghetti monster” where filament is left covering the bed looking like strands of spaghetti.
Printers also need regular maintenance; this can vary from something as simple as cleaning the print surface, so the filaments will stick to tightening loose belts. Additionally, all filaments are hygroscopic to some extent. This means that over time they will absorb surrounding moisture, which can heavily affect the resulting prints.
A Note On Storing Filament
We have a blog post coming soon on storing 3D Printer filament! Keep an eye out.
Support Material & Printing Complex Parts
Support material is a staple of 3D printing. It can be enabled in the slicer to build a temporary structure to print on top of. This has the added benefit of allowing us to print much more complicated shapes, typically requiring printing in mid-air. In general, supports come at the cost of additional filament usage, longer print times and additional post-processing to remove.
Depending on your type of printer, you may be restricted to using the same material for both your object and the supports. This comes with the added benefit of better adhesion between the supports and object, meaning your prints will be more likely to succeed. However, this will also mean that removing supports will require more effort and usually result in a reduced surface finish. This means that material choice will be an important consideration when printing parts that need large amounts of supports. Materials such as PLA will have supports that are easier to remove than PETG, which usually have better layer adhesion.
Suppose your printer supports printing in multiple materials using multiple extruders or other means. In that case, you have the option to use different materials for the supports and objects you want to print. In this case, you can use materials that do not usually stick to each other, providing quick and clean support removal, but may also increase print times. This, however, is typically restricted to more expensive printers.
So, supports are a double-edged sword. On the one hand, we can print whatever we want, regardless of its features. On the other hand, we now need to contend with potentially extensive post-processing, longer print times and diminished surface finish.
3D Printing in Industry
3D printers have been highly influential in how engineers work worldwide. Gone are the days when complex prototypes must be set off to be manufactured over days or weeks. Industrial designers and engineers can design, analyse and refine quicker than ever before because the parts can be printed in house, evaluated, and decisions made without needing external partners. Even things as simple as TV remotes can be printed, felt in the designer’s hand and changes sometimes made within the same workday.
Here at Micromelon, we have been using 3D printers to prototype our robots since 2017 and before that to help with Uni projects and other companies products. We used 3D printing to sell our first products, refine our designs and upgrade different parts of our robots based on direct customer feedback and prototyping. 3D printing enabled us to evaluate and refine before we were ready to order thousands of robot shells at a time.
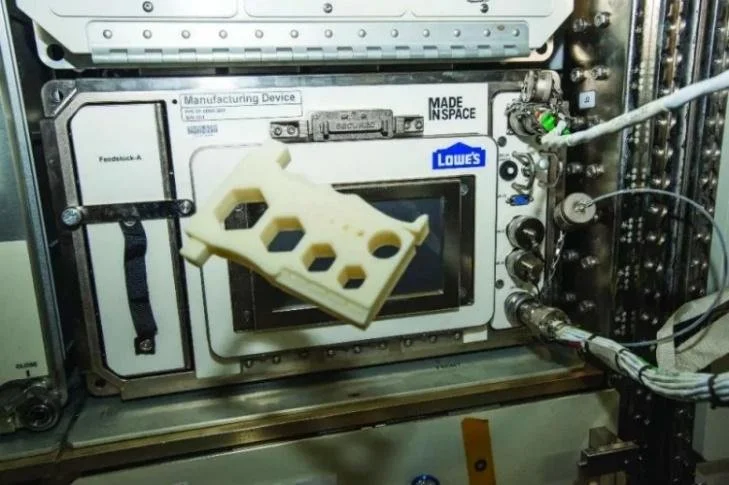
A great example of this taken to the extremes is with NASA. In 2014, NASA sent the first 3D printer, the ReFabricator, to the International Space Station, which was an FDM printer using very similar technology to what we have in classrooms today. This printer enables designers on earth to design tools and parts required for the ISS to be printed in space and used. It was also the first 3D printer to break down old prints and reuse the material to create new parts.

Finally, 3D printers have allowed people to make entire businesses based on customisation and designing parts for their hobbies. Whether it’s someone adding a cup holder to their own car or creating custom cup holders for a whole range of vehicles, 3D printing has given people the ability to customise anything and everything. Where usually you’d need a large market to sell a product, with 3D printing, you can design the part, print, and sell only a few, and it can still be worthwhile. A whole industry on Etsy and other online marketplaces has been created based on this premise. If the thing you need doesn’t exist, thousands of people who 3D model and print for a living are willing to design a part just for you.
So that is a crash course on 3D Printing. There is lots of content we purposely didn’t include in this blog post because it could honestly be a whole book. Things like which 3D Printers are best for classrooms, where I download models from, how I store my filament and how do I manage 30 or more students all wanting to print their new design at once are all great questions and ones that are best handled in a video call or meeting with some of our 3D printing experts at Micromelon. If this is you feel free to reach out via our contact form and we’ll be more than happy to support you on your 3D Printing journey.

Say Hi to Makerhero!
From filament, to repairs and spare parts. Micromelon has spent the last 6 years working with schools, businesses and individuals to repair, maintain and print great things. We run 3D printing training and webinars to the public focused around using 3D printers safely around students at schools, robotics clubs and at home.
We also own MakerHero, our very own 3D printing filament and parts brand.
Related Posts


